Announcement:

This is a Testing Annocement. I don't have Much to Say. This is a Place for a Short Product Annocement

Showing posts with label Tutorials Made Easy for Blogspot Blogs. Show all posts

Monday, February 11, 2013

Blogger Tips and Tricks - The New SimplifiedBlogging 2013

This is a quick post. An update to let you know that Simplified Blogging (SB) is now back in the blogosphere.


I redirected SB to CashOutDecently.com (COD) for couple of months but I realized that I miss my original blog. I miss blogger. COD is powered by Wordpress so I miss doing the tweaks here.

What's new?

SB will now covered tips and tricks for blogger in terms of building a stunning template for you.

This might be the time that I will focus on writing tutorials simplified for beginners. I tell you, I was trying to cover so many things here on SB before, and I recently realized that I should only do the things I love the most.

I love tweaking blogger blogs... that's why I am back.

Honestly I love exploring a lot of things in my Wordpress blog but I must not forget where I came from.  I learned blogging in this beautiful and free platform.

I owe SB for blogger.com!!!

Stay tuned.

Image source: http://yearsixale.blogspot.com

Wednesday, August 15, 2012

Make Free Professional Blog Banners with Transparent Backgrounds

PhotoScape + FlamingText = Transparent background for blog banners

Do you wish to create a transparent background for your blog banners that will fit to your blog backgrounds without using Photoshop? Well, if you have a Photoshop installed in your PC, then you got no problem, but if you don’t you—need to continue reading this post.

There are several free banner makers out there, and one of them is BannerSnack, it is easy and instant medium of producing great banners, but the problem occur when you need to create a transparent banner to fit the background of your blog.

One of the easiest way to this is to use PhotoScape and FlamingText.

Steps:

  • Dowload PhotoScape safely using c|net here and install the all-in-one style photo editor (Mooii).
  • Here is a quick review of PhotoScape by death1968 at c|net:
Photoscape is a great programme for those who cannot afford Adobe Photoshop. It offers several filters, modification of curves (but not histograms), numerous pre-set effects (like specific film imitation effects, auto levels, vingetting, etc.). Batch processing permits for applying of routine adjustments (like renaming, photo enhancements, or re-sizing). Installation was easy (Win 7, 64 bit), software is stable, it is a full free version, contains no advertisements or junk add-ons. I can recommend Photoscape to anyone.

Create a transparent background using FlamingText with the help of PhotoScape:

  1. Choose logo from the 'Featured Logos' at FlamingText.
  2. Create a logo with transparent background, see screenshot below:
  3. Download the logo by clicking download, save file!
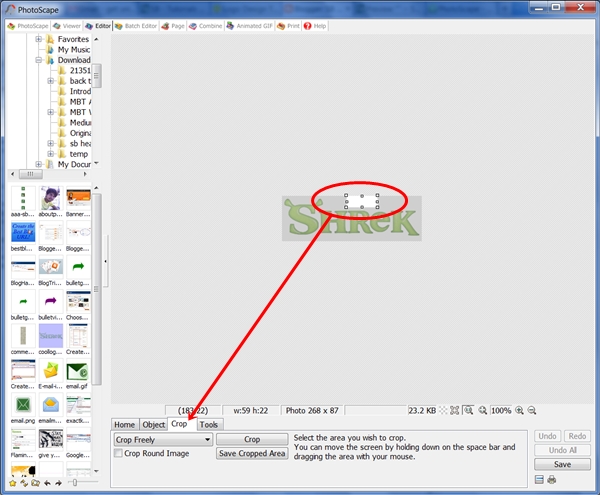
  4. Go to PhotoScape (assuming you are done installing it) and open Editor and look for your downloaded logo, then crop a little portion of the transparent logo background as shown below:
  5. Save the cropped image, re-size it (bigger), and save it as a permanent image for transparent banner making. In the example, I re-sized the image to 950 X 250 and saved it as transparent950X250.png which is good for blog header banner with transparent background! Remember, transparent image has a file extension of .png!
  6. Now, let's begin making a transparent banner for you blog. Use PhotoScape in making your banner, you can also create separate logos at FlamingText and combine it at PhotoScape Editor using the transparent image you just created. The banner below is for the SB Test Blog:
  7. See, it would fit to several blog backgrounds:

Are we done? No...

A creative blogger experiments, try to make your own, try to produce several banners of different styles, colors and sizes using this free resources and smart technique!

See you...

Friday, May 25, 2012

Download <hr> Lines and Images, or Make Dotted, Solid or Dashed <hr> Lines

HR Tag
I searched the web for available <hr> line designs and fortunately I found one! We can make use of these pretty lines to make our blog lovely.

In this post I will:

  • Tell you where to download beautiful <hr> lines.
  • Teach you on how to make your own hr lines using HTML or CSS Border Properties.
    • make noshade <hr> lines
    • make <hr> with backgrounds - use <hr> images from Smashing Magazine
    • make dotted, solid or dashed <hr> lines
For the time being, I love to use PhotoScape, previously I wrote Make Free Professional Blog Banners with Transparent Backgrounds with the help of the mentioned photo editor. Yet, we all know that Photoshop is far more powerful and it's not free. That is why, when it comes to designing, we try to search for available designs downloadable from the web such as <hr> lines spiced up with different interpretations. I found this one very helpful, in fact, my current SB banner is made from the pretty <hr> design I have chosen.
SB Banner - Bright Idea

Well, do you wonder why I got the beautiful "brain" as in "bright idea" background? Don't :)
Visit The <hr>-Contest Results – Download your fresh <hr>-line now! @ Smashing Magazine!

Trivia!

HR stands for Horizontal Ruler. It divides texts or paragraphs in your webpages. HR or <hr> tag or line is controlled by HTML attributes. In order to customize <hr> lines, you need to learn the basic HTML attributes.
  • noshade - solid line, if you set your HR lines to 25px high, it will appear as solid line, not a box.
  • size - height of your HR line
  • width - width, yes, and you can either use pixel or percentage such as 500px, 300px or 100%, 95% etc.
  • color - the HR color
  • align - it's location, left, right or center
  • height - same function with 'size' but used in different HR format (you will know)
  • background - without noshade attribute, you can use background (solid color or images like gif, jpeg or png)
  • border - it's when you want to see dotted or dashed HR lines

How to make HR lines with noshade attribute?

You will create an HR line or tag as solid line, with size, color and align attributes. Choose one:
<hr noshade size='10px' width='250px' color='#347235' align='center'>

<hr noshade size='10px' width='250px' color='#000000' align='right'>

<hr noshade size='10px' width='250px' color='#733572' align='left'>
It would then appear in your browsers like this:


You can change the size, and color. You can use the Color Code Generator to select the perfect color you want.

How to make HR lines or tag with background image or as background image instead?

<hr style='height:50px; width:500px; color:transparent; background: url(http://media.smashingmagazine.com/images/hr-images-yes/hr4-arthur-rehm.jpg)'/>
It will appear exactly like this:

Remember: Note the format I used, I started with style inclosing all the attributes with ''. I also used URL as background by using background:url(the url of your image).

How to make dotted or dashed HR lines?

This is about a little more tweak, since we cannot really create dotted or dashed HR tag using its basic attributes, this time, we will gonna use the CSS border properties. Choose one:
<hr style='width:95%; border:none;border-top:#347235 1px dotted; '/>

<hr style='width:95%; border:none;border-top:#000000 1px solid; '/>

<hr style='width:95%; border:none;border-top:#733572 1px dashed; '/>
The 3 HR lines will appear like this:


Note: Since you are using the border attribute, DO NOT use the height or size attributes of HTML, use border-top:#733572 1px dashed instead. Always add border:none.

You can change the pixel size and color, as well as the border style to solid or dotted :) Let's try another one by changing the pixel size of borders.
<hr style='width:95%; border:none;border-top:#347235 5px dotted; '/>

<hr style='width:95%; border:none;border-top:#000000 5px solid; '/>

<hr style='width:95%; border:none;border-top:#733572 5px dashed; '/>
It will appear like this then:


That's all. And, try all these using the HTML Editor of W3schools!

See you:)

Thursday, April 26, 2012

Picnik Is Not Over as Google Plus Creative Kit Got Picnik for You

Since Picnik was over, we are on the go now to find the next superb photo editor that will instantly help us in editing our photos. I know that many of us love Picnik and disappointed of its closure. But now, all we can do is sit back and try another online photo editor that is as good, as fast, and as useful as Picnik.

Picnik is not Over!!!

I also used Picnik before, not that much, but I enjoyed editing my photos there. Anyway, if you really miss the whole thing then it's not really gone in the wind as you can find Picnik at Google + Creative Kit! The team behind Picnik has been working with Google for few years, and it's hard to serve "two masters at the same time", so a decision has made!

Last day I able to make a quick tour at the creative kit, some of you may type Google + Creative Kit at your browser, but all you see are those guidelines on how to use the thing. Where can you find it anyway? Well, log-in to your Google Plus account and select one of you photos (click and view your photo) and you will see just at the upper left corner the Creative Kit.

Anyway, let's try Creative Kit now!

Steps:

A friend of mind is sad for losing Picnik, she love editing her own pictures, and I introduced her to Google + so she can have the access of the Creative Kit! I also read several "not good comments" about the closure of Picnik. Anyway, it's normal-- they loose a friend! But, Google Plus + Creative Kit is here, our new companion for photo editing! You can read those comments, and a nice tutorial about how to use the kit at Guiding Tech. Anyway, I have mine as well:
  • Go to Google Plus
  • Go to your Photos, well, you got choices: from your phone, album, your posts (if you have a blog), and photos of you.
  • Click a particular photo from your album for example, and you see a Creative Kit button just at the upper left side of the interface.
  • And... Picnik is not over! You will see when you click the Creative Kit button.
  • What can you see about this? I enjoy editing my photo as much as I did at Picnik!

Why not give it a try? Indeed, Google has everything for us to enjoy!

Saturday, April 21, 2012

Upload and Center Your Header Banner with Blogspot Default Template

Recently, I discussed about making professional banners with transparent backgrounds without Photoshop, and I also mentioned that blog customization must be done with your separate blog, we called it - 'Test Blog'.

Now, let's begin the experiment, and we will start it at our test blog header. I expect that you already have your header banner with you.

Reminder: This is more about 'experiment', a lot more on what you can do at the 'Blog Template Designer'. Anyway, this blog is about the simplified way on doing the tricky part of making your blog a lot more customize and professional looking, like we got here!

Objective: To center the header banner of your blog using a blogger default template.

If you are done making your header banner and want to see it on the center of your blog, then we can do that easily.

Steps:

  1. Upload your header banner as "Instead of Title and Description".
  2. When you are done, view your blog, by default your header will be seen on the left.
  3. Now, let's move it to the center. Got to your Template >> Edit HTML, check Expand Widget Templates and find this code by pressing Control and F of your keyboard:
  4. .header-inner
    Copy the next codes:
    .header-inner img {margin: 0 auto !important;}
    .header-inner {text-align:center !important;}
    Paste the above codes here as shown below:
    .header-inner .Header .descriptionwrapper {padding: 0 $(header.padding);
    }
    .header-inner img {margin: 0 auto !important;}
    .header-inner {text-align:center !important;}


    /* Tabs
    ----------------------------------------------- */
    .tabs-inner .section:first-child {border-top: $(header.bottom.border.size) solid $(tabs.border.color); }
  5. Save your template, view your template. Perfect?

Argument:

Some known tutorials told you to put some customizations before ]]></b:skin>, well, I also put many codes just before ]]></b:skin> to customize the looks of my blog. The problem arised when you are going to check the organization of your HTML codes.

If you want to work with your HTML codes neat and tidy, definitely you need to put extra effort putting customization to the right places.

More Guidance:

  • When you codes doesn't look exactly familiar, look for .header-inner or #header-inner and fine the last closing }, be guided by the demonstration below:
  • .header-inner .Header .descriptionwrapper {padding: 0 $(header.padding);
    }
    .header-inner img {margin: 0 auto !important;}
    .header-inner {text-align:center !important;}


    /* Tabs
    ----------------------------------------------- */
    .tabs-inner .section:first-child {border-top: $(header.bottom.border.size) solid $(tabs.border.color); }
  • If your codes start with #, do this:
  • #header-inner .Header .descriptionwrapper {padding: 0 $(header.padding);
    }
    #header-inner img {margin: 0 auto !important;}
    #header-inner {text-align:center !important;}


    /* Tabs ----------------------------------------------- */
    #tabs-inner .section:first-child {border-top: $(header.bottom.border.size) solid $(tabs.border.color); }

Are we done? Please do not hesitate asking for help...

Tuesday, April 17, 2012

How to Correctly Customize Your Blog Template and Embed Free Plug-Ins

Learn blog tricks slowly!
Are you interested in customizing your blog design? Well, perhaps you are in the right place now. As blog beginners, you should take things slowly. And you know, "time" will show you the way.


Learning is a "process", and you should not worry if right now you learn only few things in the blogosphere. What you need to do today? Choose one thing you want to know and:
  • focus
  • experiment
One thing I know, knowledge and intelligence are not enough if you don't enjoy the process, so make blogging unforgettable for you, whether you are writing about pets, about foods or about computer tricks.

Anyway, this would be the start for customizing your blog right now. If you want to know about HTML and many tricks on making your blog alive, you should not apply tutorials you found anywhere at your beloved blog directly.

You should create another test blog!

Create another blog and you can name it like "My Test Blog". Purposely, it's created to let your learn to customize your own design according to your taste.
  • Do you want to have a colorful template?
  • Do you want to have a simple and light theme for your blog?
And I tell you, can always make changes if you already learned the basic. If you directly apply changes to your blog, readers might be disturbed by such unofficial changes, think about them.

Caution:

As you may found several easy to embed blogger plug-ins anywhere, consider using them. Do not copy paste the code without looking for users' reviews. Most of the times, third party applications will make your blog loads slower, well, I don't want much waiting and so you do, I guess.

Consider the looks of your blog, do not make it look like a dump-site, and that is why, using your test blog for testing several blog customization and free plug-ins are advised.

Well, see you.

Monday, April 16, 2012

BannerSnack - Free Banner Maker for Your Blogspot Blogs

While blogging, it is good to enjoy the free resources that are really awesome for a better blogging experience.
One of the most important parts of your blog is your header. It's better to know on how to customize it. Since I started blogging, I am a kind of person that is always looking for satisfaction, so I always experiment several of my test blogs, and customizing the header is one thing I learned.

Do you have a boring header? Looking dull? Well, I guess you need to learn more about creating a banner perfect for your theme or blog template.

After using several free banner makers online, I stumbled upon this free banner maker which allow you to make flash banners, gif images or what we called animated banners, or simple banners like I got here at SB...

What is it? It's BannerSnack


Bragging about my experience, you can create an account at BannerSnack instantly using facebook, and they have just recently updated the whole site and it loads faster!

What else?

Update: After enjoying bannersnack, it's about going premium as I can only download new or existing banner again with watermark. But it's not a problem at all, make a banner with allowance, say 250x250, make it like 270x270, and crop 250x250 after downloading it :)

Read the tutorial on how to exactly edit banners with watermark: How to Edit or Remove Watermark from Downloaded BannerSnack Banners?
  • You can edit your existing banners anytime.
  • You can download gif banners without watermarks or branding (so they look really yours).
  • You can create new banners instantly with different sizes, and colors!
  • You can add your images, you can use their free cliparts, well, you can do a lot of customization!

I am sure there's a lot more, so why not try it?

Tuesday, April 3, 2012

3 Important Characteristics of the Best Blog Address or URL

Introduction:
You cannot create a blog without a unique blog address or what we called URL.

It is exactly like saving an Excel or a Word document in your computer, whether you choose to save it in hard drive C or D.

Exactly, your blog address is your blog file name on the web, readers or searchers can only access your blog through that address.

Hence, it is very important to create the best blog URL that is correctly blended to what is your blog all about.

Blog URL's 3 Important Characteristics:

  • Appealing
  • Memorable and Readable
  • Easy to Spell

Related Points to Consider:

  • The correct blending of your blog address to what is your blog all about.
  • The permanent use of your Blogspot URL at the early stage of blogging.
  • The decision to buy a custom domain for your blog.

Understanding the Key Points:

Your blog address is your blog contents at first look. Is it worth clicking? Does it attract readers to read your content? Is it memorable? Is it readable? It is easy to spell?

Why consider these?

  • There are pretty women that are not attractive to the eyes of men; these ladies have less sex appeal, and so there are great blogs that are not intriguing to the eyes of readers, so find that ‘sexy’ word or words that would entice readers to read yours.
  • Your blog URL must be memorable, I have visited great blogs before but I find it hard to revisit them because I totally forget their addresses. Short addresses are easier to remember than longer ones.
  • It should be readable, often times it goes with memorability, do not create a blog address that is a total stranger to the eyes of your potential readers.
  • Is your blog address easy to spell? Few readers might go back to your blog by typing your blog address at their browser’s address bar. How if they misspelled it?
  • Including hyphens (-) and numbers (0,1,2 etc.) often times make your address hard to spell correctly.

    Example:

    www.myblog-images.blogspot.com
    I often times insert the hyphens after my, www.my-blogimages.blogspot.com which later gave me a blog not found!

Going Further:

How to blend your blog address to your blog contents?
Example:
When you see a box with printed pictures of apples on it, what do you think are inside the box? Apples, right?

What would be your reaction when you visit a blog with an address of www.iloveapples.blogspot.com when in fact the blog is all about cooking recipes?

You might go back or close the tab because you are looking for apples and not the cooking stuff.
Why use a permanent Blogspot URL when you are not yet using a custom domain?
Blogger clearly states that if your change your blog’s URL, you release the old URL for other bloggers to use.

Example:

www.playingtennis.blogspot.com

Later changed to:
www.tennischampions.blogspot.com

You can change your blog URL by going to Setting >> Publishing >> Blog Address, but it is not recommended to perform such action when you are using www.playingtennis.blogspot.com for more than a month or so because you already have few readers.

Definitely, you will lose your few hundred readers or page views, is that bad?

Your blog address might be taken by someone else and all links to your posts will be no longer available and it’s called dead or broken links.
What if you already want to use a custom domain after several months of dedicated blogging?
Blogger allow you to host your blog with a custom domain, and this time you are safe because your Blogspot URL will be redirected to your custom address.

Example:

www.playingtennis.blospot.com will be redirected to www.tennischampions.com
and
www.playingtennis.blospot.com/facts-about-tennis.html will be redirected to www.tennischampions.com/facts-about-tennis.html


Effect: If you have a Google page rank of 1 or 2 with your Blogspot address, your blog will go back to PR 0, but that’s not a big deal this time. (To be discussed next)

Why you need to host your blog on a custom domain?

It is your blog’s brand and identity, and your blog will become more reputable in the blogosphere and search engines.

.com is the best extension for your perfect blog address.

Example:
www.tennischampions.com which is subject for availability

If you are going to look for several popular blogs on the web, then you will see they are all hosting their blogs on a custom domain.

Luckily, Blogger let's you host your custom domain free of charge!

Points to Remember:

Your blog address is a very important part of your blog, you cannot publish anything on the web without a file name. When you have several post already, your blog address acts just like a folder in your computer, and all your posts are documents saved in it.

This time, you are not just the one to use it, so make it friendly for everybody by applying few important characteristics as discussed.

Nevertheless, when it comes to blogging, the quality of your posts is always on top of the list! You can read 5 Steps on How to Begin Writing Quality Post for Blogspot Blog!


Resources:

Thursday, March 29, 2012

5 Steps on How to Begin Writing Quality Post for Blogspot Blog

Recently I have highlighted 5 important parts of writing a quality post in your Blogspot Blogs (Read it here!), today we will tackle the subject a little more for better understanding.

Your blog is the place where you published your knowledge about a particular subject you are expert with. Your great and informative content will give your blog readership and support.

How will you do that exactly?

  1. Write about topics you are knowledgeable about.
  2. Write search-friendly topics.
    • Introduction to Google Adwords Keyword Tool
  3. Do not publish duplicate contents from other sources, plagiarism is strictly not allowed.
  4. Be creative and resourceful.
  5. Build up your writing method:
    • Brainstorming
    • Drafting
    • Editing and Proofreading
    And Learn the 'common mistake' in writing and publishing your blog post!

Let’s understand each point better:

  1. Write about topics you are knowledgeable about.
  2. Each one of us is unique; we have our own skills and abilities, and some people out there might need them. In order to reach out, you need to turn your expertise into writing so it will be available in the blogosphere.
  3. Write search-friendly topics. This portion might be new to you, but let’s make it really simple.
  4. The key to a search-friendly post are:
    • A) Write a descriptive, precise or specific title.
    • B) Do not burry your ideas and incorporate keywords within your post content.

    A) Write a descriptive, precise or specific title.
    There are hundreds of millions searches that occur on Google every day. They are specific words or key phrases people used in searching information on the internet and research shows that people are becoming more specific in their searches so you need to match key phrases with your post title.

    How would you know your post title match the specific phrases people used in their queries online?

    These specific words or key phrases are called keywords, and Google Adwords Keyword Tool can better help you in matching your post title to people search queries. Always consult the keyword tool and make it a habit.

    Introduction to Google Adwords Keyword Tool:

    Every Blogger should take the challenge of the stiff competition amongst blogs in the blogosphere; the key to a successful blogging is dedication and hard work. If you take the challenge, you should open your mind that you are not just a writer. Are you ready?

    Note: Google Adwords Keyword Tool might be confusing, but one important objectives of this post is to befriend this useful tool in keyword research for SEO.

    According to Google, SEO is the acronym for Search Engine Optimization or Search Engine Optimizer.

    As a blogger, your task is not writing alone, you can be a search engine optimizer! As early as stage 1 of blogging, you need to learn using the keyword tool so that little by little you will push your blog to search results.

    Remember, the use of this tool is called keyword research.

    Let’s get started:

    1. Copy and paste this to your browser address bar: adwords.google.com/keywordtool
    2. Sign in. All other Google services can be accessed using your Google Account.
    3. Check the boxes as shown below:
    4. Start your keyword research and just enjoy it.

    Why you need to check ‘Only show ideas closely related to my search terms’ and ‘[Exact]’?

    • By default, the first option is unchecked and it will give you big counts of key phrases, and they are NOT all related to your search terms. Make your task easier by filtering only related terms.
    • By default, the second option highlighted is set to Broad, and it will give you broad results of related terms, so in order to make your task simpler, filter only the exact terms by checking [Exact].

    Why you need to star chosen keywords?

    Starred keywords are saved keywords. While conducting your keyword research, you can always view your chosen ones. If you have starred several keywords for your post, you can download them for your next step. Choose ‘CSV for excel’ and they will be saved in a spreadsheet or excel file.

    Bear in mind:

    The proper use of keywords is really helpful so that search engines can suggest your blog post to people search queries. The best example is the Bluetooth of your phone, even it is turn on, but once your setting is not set up to ‘Make device discoverable’, your device wouldn’t be scanned by your friend’s Bluetooth.

    B) Do not burry your ideas and incorporate keywords within your post content.
    • If you have lot to say, do not burry the most important points of your topic deep within your paragraphs. You can list them down in the beginning, explanations come next.
    • From your keyword research, filter the right keywords and use just few, or a reasonable number to your content, do not overuse keywords because your content might sounds like a spam to search engines.

    Points to Remember:

    • Match your post title with the specific keywords, but learn more about it. It doesn't mean that your post title is only those keywords, at least it match the important key terms of your post title.
    • You can also use keywords within your post, but limit the number. And your post content must cover your title fully! Do not deceive your readers by writing attractive post title without great content!
  5. Do not publish duplicate contents from other sources, plagiarism is strictly not allowed.
    • Always bear in mind that the purpose of starting your blog is to share something you know. Your goal is to produce great contents to your readers.
    • Is it exciting that at the end of the day you are able to help people because you are at your best in giving them the same thing they are looking for?
    • Your topic might be the same or related with several hundred already available online, your biggest challenge is to give them more, and you cannot achieve that if you only copy or paraphrase ideas from other sources.

    Remember, plagiarism is a crime and you do not want to commit one. It’s Stealing.

    How can you use ideas that are not yours?

    Acknowledged the authors, give proper citation. You can cite by inserting links to their sites at the end of your blog post. But you cannot used their whole idea as your main post as well, pick one and strengthen yours by using it as short excerpt or quote.
  6. Be creative and resourceful.
    • “A picture is worth a thousand words.” Aid your post with pictures. You can also embed videos from YouTube. Use the post editor to make your post alive!
    • Original photos – that’s recommended. You can upload your photos to spice up your post.
    • What if you don’t have photos? You can use free to use photos from several sources, I recommend freedigitalphotos.net, always provide link back to the contributors’ page. Simply download the pictures and rename and upload it to your post.
  7. Build up your writing method: brainstorming, drafting, editing and proofreading.
  8. Writing is a process. There might be brilliant ideas in your head now, but you find it hard to turn your great ideas into a great post.

    What to do?

    1. Brainstorm yourself – What do you want to share to your readers? List down key points.
    2. Draft your ideas- Write your post using your key points. Make your first paragraph, proceed to the next and finish writing your entire post.
    3. Editing and proofreading- Edit your grammars and spellings. Delete unnecessary words and sentences. Add information if it’s needed.

Common mistake:

Do not publish your post in its draft stage! That’s a common mistake, especially if you write directly at Blogger.

You think it is okay but it’s not! To avoid that, draft and edit your post using a word document. Give your readers a good impression to your blog; a good idea might be not too good with grammar and spelling errors.

Sources:

Saturday, March 24, 2012

How to Begin Blogging - A Complete Tutorial Made Easy for Blogspot Blogger

Where do you hear the term blog and blogger? What comes in your mind when you heard the word blogging?
At this far, I assume that you have already made some initial searches about the terms blog, blogger and blogging. Before I would state a quick review of these 3 important words, I am happy that our team finally came to a point of identifying our readers; this is a fresh start for us to actually change our whole subject and gave you the best we can offer to our selected readers, you, blog beginners. From now, topics will be carefully chosen to help and guide you on how to begin blogging using Blogger, the best free blogging platform available for you. Our tutorials will revolve around the subjects Blogging with Blogspot. So get ready guys.

Quick Review:

What is a blog?
Well, let’s make it really simple for you. It’s from the term web log - shorten – now we can easily read it as blog. It’s a personal journal, meaning, you have written something and you published it on the web. It’s called post, and once you have published several posts about a subject you love writing about, it will be arranged in a reverse chronological order, so the most recent post will come first. All these, it’s called blogging.

You can always use several networking sites in sharing your ideas, but if you want something special, if you want something you can call your own, if you want to take control of all your ideas, then you will going to step up and do your first blog. You know, there’s a lot more in blogging and you will know it soon!

Who is the blogger and what is Blogger?
Blogger as a person: The blogger is you. Once you started your journal and pick up the platform in publishing your ideas on the web, then you became the blogger. A blog won’t exist without the blogger.

Blogger as a platform: You have written your journal and you need an easy and useful platform in publishing it. You need Blogger. When you look for the best free blogging platform to publish your journal, then it’s always be Blogger. Blogger will host your content and it’s always free.

In other words, Blogger is called the medium of sharing your valuable ideas.

Let’s get started:

Does it sound biased for me to only tell you that Blogger.com is the best blogging platform? No, it’s not. I am a blogger for more than a year now, and if you are looking for a 100% how to blog free platform in the web, then it is Blogger and Blogspot.

As beginners, you don’t have to get confused; you will love doing this thing if everything comes handy. First thing first, select which platform you will use… now, it’s blogger.

Why blogger?
It’s easy, the blogger interface is friendly. When you bought your phone? What’s the most important thing you considered aside in its durability, its friendliness right? When you use blogger, I am sure you won’t get lost.

It’s free. Perhaps it is not the only thing that is free, but it’s free forever. Along the way you will understand exactly what I mean about it.

Are you ready to set up a blog in blogger?

I am excited. It’s too easy, promise. Here is the step by step process to create your very own blog at blogger.com! Please be guided by screen shots below:
  1. Go to www.blogger.com
  2. You have 2 options, if you have your existing Google Account already, sign-in to access Blogger or create your first Google Account.
  3. OR
  4. Sign-up for Blogger. Simply fill up the name you want to appear in your blog posts, e.g. The Pet Lover or your name. Choose Gender and Check ‘I accept the Terms of Service.’
  5. Name your Blog. You have 2 important things to do: Brainstorm yourself about a good and appealing title for your blog; and your Blog address (URL).
    • Blog Title
    • – It should be carefully chosen, at first look, it will give your readers the idea of what is your blog all about. First impression last, so give them a good one.
    • Blog Address (Your Blog URL)
    • – It can be your blog title. Your Blog Address should give your readers the idea about your blog just like your blog title. If your title is not too long then you can use it, or you can use the most important words within your blog title.
    • Example of a Blog Title:
    • My Favorite Pet
    • Example of a Blog Address:
    • myfavpet123.blogspot.com Remember, you can only use your desired blog address once it’s available. And most importantly, you cannot change your blog address once you are done with the set up of your Blogspot blog. Later on you will discover that you have the option to change your blog address, but it’s really not recommended (We will talk more about this on the next tutorial).
      So, the best thing to do, give yourself enough time thinking about the best blog address your blog should have.
    • It should best describe your blog
    • It should be readable and easy to remember
    • It should not be too long

    What is blogspot.com?

    It’s the domain name provided by Blogger. It will be part of your blog address, e.g. myfavpet123.blogspot.com and it will be always free, and your blog address will be a subdomain of blogspot.com (We will talk more about this on the next tutorial).
  6. Choose a Starter Template – “You can change your template later, and even customize it with the template designer” – Blogger.
  7. Note: Blogger Team recently made changes and updates to blogger, they provide bloggers the Dynamic Views, but I recommend you to choose the simple template first. We will do some experiment later like customizing your blog design the way you like it.
  8. Your Blog Has Been Created! Now you are ready to share your first journal.
  9. Have you written it already or do you want to directly write it on Blogger? Your first post will be so special, isn’t it? I will give you the simplest tips to do while writing your post. Read 5 Steps on How to Begin Writing Quality Post for Blogspot Blog!

    The screenshot below highlights the important parts of writing your post.

    1. Post Title – If you have an interesting idea in mind, give title to it first. It will become your overall guide in writing your paragraphs. Your title should be appealing, readable and specific.
    2. Post Body – Use your own style in writing. Be you. Share your most interesting idea, go deep down. Share your expertise and convinced your first few readers.
      Note: Always check your grammar and spelling, as much as you can, publish your post free of typos.

      In addition, it’s not all texts alone, as you can include photos, links and videos in your post… (Experiment..! you can do more in the portion highlighted in blue, see screenshot.)
    3. Labels. Labels are important part of your blog. Labels are like folders you have at work. You classify each of your documents, you grouped together similar and related ones. Always separate labels with commas.
      While your blog title is specific, your labels are general ideas.

      How many labels each post should have? You can provide one or two; you can see the function of labels once you have published several posts already.
    4. Preview. Remember the word best! Do your best every time you write your post, always preview your work before publishing it; use it until everything looks good.
    5. Publish Post. Are you satisfied the way it is presented? You can publish it right away and tell your friends you got one!

Who are your first readers?

Your first few readers can be your family members, friends, and colleagues, but aside from them we will identify who will be your loyal readers in the long run.

In marketing, your products must be targeted to a specific market and so as blogging. You blog because you have expertise worth sharing, the question is, who will be interested in your ideas? Provided millions or even billions of people are online everyday and searching for information, how can you identify your readers?

Don’t worry, I will help you.

You are marketing your ideas now. What are your ideas shared on your blog? In our example, your blog is about your favorite pet so you can share valuable ideas and tips about the subject to people who love pets, but this target is still broader. What is your favorite pet? It might be dogs! So your specific readers are dog lovers.
What can you do? Share valuable tips. Give them the answers to their queries.

Personal experienced:

Honestly I failed to target our readers here at SB. It is true that experience is our best teacher. I shared this because this stage of blogging is really important for you. I failed to stay on focus, that’s the thing I want to change. If I did better last time, this time it’s my best! And you, blog beginners are my target, I want to help you.

Conclusion:

Blog is a published journal of your expertise and it is shared to your targeted readers to help them find the answer to their queries. In order to start your blog, you need to decide what blogging platform you need, and Blogger.com is the best free blogging platform available for you, it would be your medium in sharing your skills.

Update!!!


    Resources:
  • problogger.net
  • Blogger Screenshots are properties of Google, Inc.

Copyright @ 2013 Simplified Blogging. Designed by Templateism | Love for The Globe Press