Announcement:

This is a Testing Annocement. I don't have Much to Say. This is a Place for a Short Product Annocement

Saturday, June 30, 2012

Top 3 Free Contact Email Form Builders for Blogger with Tutorial

Well, most of you want the easiest way of making your contact email form or contact us for your blog. The reasons are simple:
  • You have no enough knowledge amount form customization.
  • You want to focus more time in writing your blog content.
  • Your blog has no contact form yet. Providing your email address is not safe.
  • Your readers want to communicate you in person, how would you know?
Today, I would give you top 3 on my list. These are contact email form builders specially for blogger platform that will guarantee that your readers can reach you in private safely.
The Easiest and Simplest!
foxyform.com
This is the easiest way of making your contact form. Generate the code within few minutes. What's good, this has a built-in anti-spam protection... you are rest assured that your inbox won't be full of spam messages. In 3 Easy steps, your contact form is ready!
  • Settings - check the one you wished, the basic fields are name, email and subject.
  • Advanced Settings - you can change the font color and background color, as well as the font style of your form.
  • Target Email Address - this is the destination email. Messages coming from your readers will be sent to that email. If you have a customized email address like mine, e.g. support@simplifiedblogging.com, you can best used that. Or, least, make another email address for that purposes only, e.g. support@gmail.com, or you might prefer using your existing email. Click create formular to get the code. Copy and Paste to a new page to your blog the entire code.
  • Anti-Spam Protection - this is the bonus feature. No boot can mail you spam messages. It's human test!
The Best with Customization Tutorial!
No, am not biased, I'd say this one is the best for me.
emailmeform
Let me list down what make it the best as to experience:
  • It will provide your reader a page redirection after they have sent their message to you. You can then specify an URL as a redirection or landing page. You can say "Thank you, you message has been successfully sent. We will contact you as soon as possible to answer your queries, suggestions or opinions", and message like that.
  • It has spam protection, even if some features are available for upgraded members, but the free service is awesome. You got 200 as sending limit a month, but it's enough.
Learn how to customize the form in my previous tutorial:
Custom Contact Form for Your Blog - The Easiest Way!
One of the Best According to Some!
wufoo - online form builder
Yeah - this one is awesome. It's a form builder, build anything, they host everything. So far, am amazed! I got an account already... experiment - love it!
Differences!
Foxyform let your create and generate the code for your contact email form without registering for an account! It's that instant. While the rest will gonna require you to sign up for an account, so you have access to information on your dashboard. Edit existing forms or create new ones.

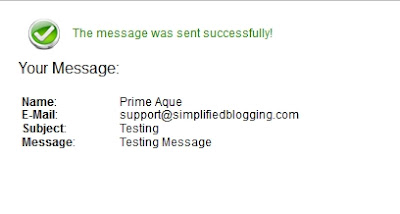
In foxyform, sent messages has a neat confirmation not leaving your contact page, but you have no dashboard to access with. The screenshot below shows my test message:
Next... my experiment with wufoo!
See you guys. Do some experiment too :)

Friday, June 29, 2012

Update AddThis Sharing Tool to Include Pinterest and Google+

Have you updated your AddThis Bookmarking Tool installed in your blog? I have just noticed today that I miss a Pinterest button, so I looked for ways on how to do it. Amazingly, AddThis has a Pinterest Button default in it's script, what's missing is the precious Google+ button. What need to be done now is add back the missing G+ button, so that we will have a perfect sharing options from Facebook like, Tweet, G+, Pinterest and the rest provided by AddThis pill!

Anyway, the screenshot below show that only the floating widget has the Google+ button with counter:
Recently, I have included AddThis as one of the Top 5 Blog Tools for Building a Great Blog.
How to add back the missing g+ button?
    If you have already updated the sharing widget and found out that g+ is missing, do the following:
  • Open Blogger Layout and open HTML/JavaScript where your AddThis script is saved.
  • Expand the widget by maximizing the window and dragging the bottom right of the box as shown in the screenshot so that you can view the entire codes and script.
  • This time, simply add the g+ plus code along the existing ones. Please screenshot, click to see the full size:
Here is the code to be added there (Copy and Paste this), the ones highlighted at the screen shot above:
<a class='addthis_button_google_plusone' g:plusone:size='medium'></a>
Anyway, the next code will show a more clear picture where the g+ be placed. Search for <a class='addthis_button_tweet'></a> by pressing CTRL + F.
<a class='addthis_button_facebook_like' fb:like:layout='button_count'></a> <a class='addthis_button_tweet'></a> <a class='addthis_button_google_plusone' g:plusone:size='medium'></a> <a class='addthis_button_pinterest_pinit'></a> <a class='addthis_counter addthis_pill_style'></a>
Why I still choose AddThis?
Am not a geek, but I know this sharing tool is perfect as a third party application to blog for its lightness, neat look!

So, you can easily place it now... see you guys.

Thursday, June 28, 2012

Drive Traffic to Blog by Installing Tynt Publisher Tools

We are constantly looking for blogging tools and seo that will help us rise in the blogosphere, am I right? But it's hard, the real traffic and promotion is like enrolling in a calculus class, where your professor does not exert his best effort to teach his students. I don't like that much, I'd rather study on my own. But today, I stumble upon a very good tutorial about driving traffic to our blog with the use of reader's engagement through copying some texts from our post content, and pasting it elsewhere. They might share it via email or social networks. A free tool, easy to install can help us do that, without effort - yes. Am not repeating the tutorial because this one is a complete guide - Mayura4ever.
It's a spoon feed. It's gonna be a long tutorial but it's worth reading! Well, let me write what I learned:
  • Tynt publisher tools will run a script on your blog to track "copy pasting" activities of your readers.
  • Without Tynt, "copy paste" cannot help your blog in driving traffic.
  • It helps your blog drive traffic because an URL back to your blog, as well as twitter and Facebook account will be added together to the copied text automatically.
  • Every time readers read your blog and copy paste some text from it, share it to social networks or rather email it to a friend, a link is attached.
  • Tynt offer you a dashboard with seo and tracking tools. Discover how your readers share your content.
Below is a screen shot, I copied some text from my recent post and paste it on a mail.
See? It will gonna help you drive some traffic. Make every possible way counts!

See you and thank you again Mayura :)

Wednesday, June 27, 2012

How to Write Faster Maintaining the Quality of Your Content

A big difference yes, writing fast, posting fast can sometimes sacrifice the quality of our content. But it's not always the case. In this situation, if you are like me, you will gamble to learn the ways, the appropriate technique in writing your blog post fast without sacrificing its quality. How can we do that anyway?
This is a follow up post of my recent topic about A Technique to Writing Fast - Make a Post within 20 Minutes or Less, of course, one should take caution in writing fast, you need to be alert for spelling mistakes, grammar errors, and sort of. But the real problem is your message. How can you craft a informative post in less than 20 minutes?
Everyone is busy.
From that concept, you need to present your ideas at "first look"! Don't let them search it, give them what they want instantly - that's writing fast. Take this, if you have the idea in mind, write it fast and the output is a concise post, a direct to the point content! Listed below are tips:
  • Write your title first. It's first thing first. It cannot exceed 70 characters, use word counter, MS word will do.
  • Edit your post by paragraph. You can easily spot typos this way. You only need the final reading after drafting the entire content.
  • Write less to avoid flaws. You are giving idea and information to a reader wanting it badly. Writing it with too much flowery words can destruct you from writing straight to the point.
  • Spoon feed. How graders are taught? Teachers give them everything. A complete "how to".
  • Do not write unfamiliar topic. Though it's viral, it doesn't mean you need to write it. Prioritize the one you know best.
  • Upgrade your style. I do, I just realize writing post with several topics or subjects do not worth the effort. I just did not have the clear mind, so clear yours.
To Sum Up:
Write a good title, write your post, make sure everything is written well including correct punctuations, write direct to the point (focus on one), do not write unclear idea, busy people like me hate it (the truth) = then you can write fast maintaining the quality of your content.

Image Source: bpaquality.wordpress.com

Monday, June 25, 2012

A Technique to Writing Fast - Make a Post within 20 Minutes or Less

Writing fast. Writing with message for my readers. Is that hard? It sounds hard, but all of us can do that, say yes. I say yes. Today, let's make writing fast within 20 minutes time. Yeah, no time to edit after this, so I guess it's the real challenge.
Latest Update: 5 Powerful Tips on How to Write Blog Post Fast During Break Time
Update: How to Write Faster Maintaining the Quality of Your Content.
Why some bloggers need to learn to write fast?
Time constraint. That's the direct answer. Am working as an accounting staff, am studying BSA, am maintaining my blog, I have my personal life, is 24 hours a day enough? Yes - it's about time management and making things quicker. How to do things quickly? Presence of mine, concentrate and achieve things. Focus on one thing at a time. I write so my mine is writing!
How to make writing that fast?
  • The most essential thing is preparation and knowledge. You open your post editor now because you have something in mind to share to your readers. I clicked new post now because am eager to write this idea "writing fast".
  • You can't write fast if you don't know your subject. So, what's the secret? While you are at your work, think of something that is applicable to your blogging career, make a note, list down possible key points and write something about that idea later.
  • Are you in writing mode? There are times that you really want to write. Pause, stop doing your task, for 10 to 20 minutes, draft your new post. That's it.
  • Make your leisure habit productive. As what I have said, if you don't have the idea, you can't write. So keep on reading! I have a post about it - Top 10 Tips to Keep Your Mind in a Good Writing Mode!
Speed writing must be done with caution. There are lot of things that can be done to make the written content less quality if we won't carefully consider them such as correct spelling, correct grammar, the coherence or the significance of the entire content.

Anyone can write, any blogger can write content, but the question is, did we deliver a message helpful to our readers? If not, we should re-draft. I updated this post to remind everyone that we can only write fast, only if we have the "instant idea and concept" in mind. We could not just write down things without purpose.

If you have the idea now, why not take the opportunity in writing fast within 20 minutes as a short break from your paper works? You should try it.

Image Source: contentflicks.com

Thursday, June 21, 2012

What is Google Webmaster Tools in the Eyes of New Bloggers?

When we read about webmaster, and some sort of things - what do you have in mind? Another hard thing? Another challenge? That's what I actually thought, these types of information are analytical and technical, yet, all of us "new bloggers" can actually try to use and apply it at least.

What are the things that make you think it's better to leave it for the experts? For the webmaster geeks out there? Perhaps, you think it's hard, all you can do is write and scribble down your post. NO, it's wrong, you can always try these things for good - for your own good.

As newbie in the blogosphere, you need to know things beyond the look of your blog. Do you have a beautiful blogger template? How about the health of your blog? Is it healthy? How would you know?

We go to the hospital, have some doctor's check and prescription to insure that our health is good. Same, your blog, my blog needs some check up. It's not optional - it's recommended. And what is the tool that will help you check your blog's health? Well - it's the Google Webmaster Tools, check yours!

So - What are the things I found helpful?
  • Messages - Check for occasional messages, specially if blog got some serious trouble perhaps.
  • Configuration - "touch me not", you don't need to actually change or configure this one, or unless you have moved your blog to a different domain, no need to start from scratch. Just tell the webmaster of the URL of your new domain!
  • Health - this is the highlight here. We need to at least check this one from time to time so that we can tell whether our blog is doing fine or not specially the crawl errors.
  • Traffic - this will give you some important update of your blog. From there, you will know who links your blog! Those are do follow blogs, no less. You will gotta know your most linked URL, so it will give you a better idea of improvement.
  • Optimization - here comes the sitemap. Have you generated the right sitemap for your blogger blog? If so, if you submitted, say 170 webpages, then the webmaster must have indexed the same number as well. If not, read this post from MBT - Why Google Indexes Only 26 Pages Of Your Blogger Sitemap? (1)! You can also check your content keywords. Do it now :)
Anyway, aside from that, I have surfed you a very good aid to understand fully what is the function of this tool - Google for Webmasters, check this out!

Also check the Google Webmaster Central Blog for new webmaster tutorial videos.

Image Source: revili

See you:)

Wednesday, June 20, 2012

Grab 3 Custom Blogger Email Subscription Widgets

What's new today? Well, I have redesigned custom email subscription widgets for blogger and am decided to release some of them here. Recently, SB got several looks and styles, am not just contented so I keep changing some parts of the header, or the overall theme - today, this look is Official. And I am going to offer to you some of my coding experiments that worked well. Recently, I included this to the list of Top 5 Blog Tools for Building a Great Blog. Before I give it, let me tell you some tips on how to code your own:
  • Don't start from scratch.
  • Look for several coding tutorials and study them with interest.
  • Copy those codes, and experiment on it - keep on tweaking, and you will know something your own from there.
  • See? You did not start from scratch, but your created a unique idea from the existing one.
Excited for the code of the custom blogger email subscription widget?
This custom email subscription widget is powered by feedburner, if you don't have a feedburner account, better get one now.
3 simple and custom email subscription widgets:
Green - the main theme of SB #347235

<style>
.sbsubscription{
width: 300px;
float: left;
}
.sbsubscription .emailupdatesform{
margin: 15px 0 5px 5px;
width: 300px;
float: left;
}
.sbsubscription .emailupdatesform input.emailupdatesinput{
background: #fff !important;
float: left;
border: 1px solid #347235;
border-radius: 5px; -moz-border-radius: 5px; -webkit-border-radius: 5px;
padding: 0px 8px 0px 8px;
color: #000000;
font-size: 12px;
height: 25px;
width: 185px;
}
.sbsubscription .emailupdatesform input.joinemailupdates{
background:#347235;
border: 1px solid #347235;
border-radius: 5px; -moz-border-radius: 5px; -webkit-border-radius: 5px;
text-transform: uppercase;
font:bold 12px arial;
color: #fff;
height: 25px;
padding: 0 12px 0 12px;
margin: 0 0 0 5px;
cursor:pointer;
}
</style>

<div class="sbsubscription-wrapper">
<div class="sbsubscription">
<div class="emailupdatesform">
<form action="http://feedburner.google.com/fb/a/mailverify" method="post" target="popupwindow" onsubmit="window.open('http://feedburner.google.com/fb/a/mailverify?uri=thebloggingsolution', 'popupwindow', 'scrollbars=yes,width=550,height=520');return true"><input gtbfieldid="10" class="emailupdatesinput" name="email" value="Enter your email to subscribe..." onblur="if (this.value == &#39;&#39;) {this.value = &#39;Enter your email to subscribe...&#39;;}" onfocus="if (this.value == &#39;Enter your email to subscribe...&#39;) {this.value = &#39;&#39;;}" type="text" /><input value="TheBloggingSolution"; name="uri" type="hidden" /><input value="Submit" class="joinemailupdates" type="submit" /></form>
</div></div></div>
This dark one, grey? #333 (Also a color theme for SB)

<style>
.sbsubscription{
width: 300px;
float: left;
}
.sbsubscription .emailupdatesform{
margin: 15px 0 5px 5px;
width: 300px;
float: left;
}
.sbsubscription .emailupdatesform input.emailupdatesinput{
background: #fff !important;
float: left;
border: 1px solid #333;
border-radius: 5px; -moz-border-radius: 5px; -webkit-border-radius: 5px;
padding: 0px 8px 0px 8px;
color: #000000;
font-size: 12px;
height: 25px;
width: 185px;
}
.sbsubscription .emailupdatesform input.joinemailupdates{
background:#333;
border: 1px solid #000;
border-radius: 5px; -moz-border-radius: 5px; -webkit-border-radius: 5px;
text-transform: uppercase;
font:bold 12px arial;
color: #fff;
height: 25px;
padding: 0 12px 0 12px;
margin: 0 0 0 5px;
cursor:pointer;
}
</style>

<div class="sbsubscription-wrapper">
<div class="sbsubscription">
<div class="emailupdatesform">
<form action="http://feedburner.google.com/fb/a/mailverify" method="post" target="popupwindow" onsubmit="window.open('http://feedburner.google.com/fb/a/mailverify?uri=thebloggingsolution', 'popupwindow', 'scrollbars=yes,width=550,height=520');return true"><input gtbfieldid="10" class="emailupdatesinput" name="email" value="Enter your email to subscribe..." onblur="if (this.value == &#39;&#39;) {this.value = &#39;Enter your email to subscribe...&#39;;}" onfocus="if (this.value == &#39;Enter your email to subscribe...&#39;) {this.value = &#39;&#39;;}" type="text" /><input value="TheBloggingSolution" name="uri" type="hidden" /><input value="Submit" class="joinemailupdates" type="submit" /></form>
</div></div></div>

Well, Facebook Color!

<style>
.sbsubscription{
width: 300px;
float: left;
}
.sbsubscription .emailupdatesform{
margin: 15px 0 5px 5px;
width: 300px;
float: left;
}
.sbsubscription .emailupdatesform input.emailupdatesinput{
background: #fff !important;
float: left;
border: 1px solid #3b5999;
border-radius: 5px; -moz-border-radius: 5px; -webkit-border-radius: 5px;
padding: 0px 8px 0px 8px;
color: #000000;
font-size: 12px;
height: 25px;
width: 185px;
}
.sbsubscription .emailupdatesform input.joinemailupdates{
background:#3b5999;
border: 1px solid #333;
border-radius: 5px; -moz-border-radius: 5px; -webkit-border-radius: 5px;
text-transform: uppercase;
font:bold 12px arial;
color: #fff;
height: 25px;
padding: 0 12px 0 12px;
margin: 0 0 0 5px;
cursor:pointer;
}
</style>

<div class="sbsubscription-wrapper">
<div class="sbsubscription">
<div class="emailupdatesform">
<form action="http://feedburner.google.com/fb/a/mailverify" method="post" target="popupwindow" onsubmit="window.open('http://feedburner.google.com/fb/a/mailverify?uri=thebloggingsolution', 'popupwindow', 'scrollbars=yes,width=550,height=520');return true"><input gtbfieldid="10" class="emailupdatesinput" name="email" value="Enter your email to subscribe..." onblur="if (this.value == &#39;&#39;) {this.value = &#39;Enter your email to subscribe...&#39;;}" onfocus="if (this.value == &#39;Enter your email to subscribe...&#39;) {this.value = &#39;&#39;;}" type="text" /><input value="TheBloggingSolution" name="uri" type="hidden" /><input value="Submit" class="joinemailupdates" type="submit" /></form>
</div></div></div>
Will they work as expected?
You can conveniently test them without putting it to your blog or any test blog. You can use w3schools HTML editor.

Final Step - make it your own!
Edit the code highlighted in green with yours. How? Log-in to your feedburner account, go to publicize, then Email Subscriptions and find yours, it's the title of your feedburner account.

Any question? Feel free to ask. See you :)

Monday, June 18, 2012

How to Find a Keyword for a Better Blog SEO

Are you familiar with keywords? In a simplified term, it's a word, a group of words, or short phrases people "you" used in finding something with the use of search engines. As a blogger and content publisher we need to know these words in order that our contents, posts, articles can be searchable. You can read my previous article about How to Do Keyword Research and Why It is Important?, that will briefly explain why it is important for us bloggers to do some careful and serious keyword research.

Today, my objective for writing this post is to let you know that keyword study must be a part of our system as bloggers. We should not put this in the last list of our priorities when we try to draft our new post. Do you have a fresh or new idea? Do you have a good title to it? It's actually the perfect time to ask the keyword tool for a better title suggestions, by incorporating your ideas to the suggested keywords.

For me - no other free tool that can beat Google Adwords Keyword Tool, it's really helpful and they have just brought some nice update and enhancement to the keyword service. Let's find out. Anyway, please read this post if you are completely new with it - 5 Steps on How to Begin Writing Quality Post for Blogspot Blog. It explained the step by step process.
What's New?
Click the image to view the full size.

  • They are group ideas - so meaning related or similar ideas are group together, and you can easily exported it an excel or csv file.
  • Important columns - keywords, the rate of competition, the global and monthly searches figures, and the approximate CPC.
  • What's the use of this info? - This is your guide in picking one or two keywords for your post. What the most searchable? Consider the rate of competition as well as the local searches.
  • What's the use of CPC? - it's the cost per click! If CPC is higher, you have the chance to earn bigger with your adsense ads provided you have a reasonable blog traffic. The more traffic, the more chance they will find one of your ads interesting.
  • Would you choose the keywords with highest CPC among the suggestions? No, not necessarily. In your exported excel file, you can add another column for potential earning, multiply global or local number of searches to CPC, then you can have a potential earning estimates. If the competition is lower, and the global and local searches are higher, and CPC is higher = higher potential earnings.
Click the image to view the full size:

So, how to find a keyword? You know the answer by now, most probably. Anyway, those are data and information that would serve as our guides, if we know, or at least try our best to know on how to use and apply them - then it's rewarding! It might be hard and tricky, but I am sure it's worth our time.

Image Source: techwyse.com

See you guys:)

Sunday, June 17, 2012

Best Blog Tools for 2012 Blogging

Have you ever asked yourself if there are best blog tools for better blogging, specially this year that you are more determined and excited for your blogging career? Honestly, there are too many tools around the corner of the web, but can we able to use them all? No, we cannot. We can only choose some, try some - and stick with the most effect ones, maybe a few, am sure those can help us move on and make a significant face with our blog posts and traffic!
Why we need some effective blogging tools?

Time is precious, the clock is ticking faster and it won't pause to wait for us - that is why we need to get faster, to hurry for valuable moves, like stuffing some good contents with our own social networks and blogs. How can we do that if we have a lot of things to do? We need some useful tools for better blogging and we can get them if we know how to find them and test there usefulness. Am a blogger for more than a year and I can share some based on my rich experiences, from scratch, from a total newbie. How did I stay in the blogosphere? I seek the help of these tools. They keep me on the go.
The tools that I rely on:
  • Blogger.com - it would be always on top. It just simply helped me build a blog without cash, 100% free. Read this post How to Begin Blogging - A Complete Tutorial Made Easy for Blogspot Blogger.
  • Google Search - why? I started from scratch, I do not know about coding and everything, I even do not know what is the purpose of blogging before, but I keep on searching, and Google had answer all my questions. It suggested me helpful sites that helped me build my blogging skills.
  • MyBloggertricks.com - upon asking Google some questions, upon continuously looking for guides to build my own blog, I stumbled upon MBT! This is a very helpful tech blog that helped me do my coding, my designs, my experiments about HTML!
  • w3schools.com - It is always good to know about little and few knowledge about tweaking and designing your blog template, and aside from MBT, this online school and tutorial helped me turn my myself into a web designer, I did coded my own template, from a free custom template completely tweaked and bring forth my idea and taste.
  • Problogger.net - Darren Rowse has equipped himself with the skills to help you write quality and great contents! Our blog is like a store, a mini-mart, a supermarket - we are actually marketing our ideas, words, and thoughts. In order to become a successful and problogger, we need to acquire necessary skills specially writing helpful, exciting, persuasive posts for our readers.
  • Subscriptions - almost all your favorite blogs have subscription tools. Do not ignore them, enter your email address and receive helpful contents from them everyday. Why? Because it can help you craft some new ideas for your blog post. A blogger actually blogs, you cannot just write once a month, you need fresh ideas and key points so that you can start writing some nice post!
  • Here I put Google Adwords Keyword Tool - this will help you find important and commonly used keywords for your post. This is the road map, if you write, you need to make it sure that your content is searchable for your readers. How they search Google? They used keywords. Acquaint yourself with the keyword tool.
Those are only few, there are too many tools around the corners of the web that you can use to make your blogging experience unforgettable. Enhance your skills, it's possible. Here I search for some helpful tools and we got some plenty suggestions. Check them out:

See you guys, and Happy Father's Day to all loving Fathers :)

Image courtesy of FreeDigitalPhotos.net

Saturday, June 16, 2012

SEO Tips for Blogs Targeted for Beginners

Blogging can be a challenging hobby when you start learning more in-depth about blogs. If you are a starter all you need to do is check out for more interesting stuff on what really happens in a blog, how they work and what people expect from your blog, etc. Here is a short guidance for you that offer you some interesting simple and basic seo tips for blogs that you can follow being a beginner. Blogging is one of the simplest ways to get you involved into online community to share and learn more to gain knowledge.
seotipsforblogs

Why you need a blog

It is important that you need to start analyzing why you need a blog at the first level. If you wanted to start a blog first decide on what is your goal and decide on the success terms and the motto behind your blog. Blogging can be of any purpose say for business advertising, spread your knowledge, share your opinion and ideas or just for fun. Once you set your goals work on the short/long term goals and start marketing your blog to reach your goal.

Identify your viewers

Your reader is based on your goals, check out who are your potential visitors and decide on the topic you wanted to blog about. Your blog should be related to the theme in terms of design outlooks and informative content that has to reflect your reader’s expectation. Identify your audience expectation and make your blog according to their needs on information.

Maintain stability in your blog freshness

Keep your content articles, design and other information to meet its standard and brand to keep up the popularity of your blog among the audience. Communication standard and your blog’s over all standards have to be perfect in terms of images and other messages you offer. You must create an impression among the audience in such a way that they must visit your blog again and again for more updates and useful stuff. Keep your blog fresh with new posts and frequent updates so that your audience re-visits your blog out of curiosity.

Blogging tools

Install some of the useful blogging tools that are meant for best features and take risk with tools that you install in your blogs for a trial and error correction method. You can include some new plug-ins to your blog to improve your blog’s performance and usage. Potential enhancement helps you to meet your goals on time with the timely response and blog outlooks according to your audience expectations.

Last Words

These are basics, like the food that we eat everyday! Well, every beginner should comply the following to have a better blogging experience. Learn more about SEO at What Is SEO / Search Engine Optimization? at Search Engine Land.

Image courtesy of FreeDigitalPhotos.net

Friday, June 15, 2012

Top 5 Tools to Download Social Media Icons and Web Icons Sets for Free

Do you have a blog or website? Do you want to spice it with social media icons free to download? It's not a problem, there are actually several websites or icon finders to help you find the best icons for your social media participation such as Facebook, Twitter, Google+ and many more. Are you excited?

Top 5 Free Web Icon Finders

  • findicons.com - so far, it's the best as I have used it for a long time already. I can actually search almost all types and all kinds of icons from there, from social icons to different types of icons you want to download. Simply type a keyword and icons suggestions would appear in numbers!
  • Highlight: Almost all web icons sets can be downloaded in different sizes and file types such as png, ico, and jpeg and more.
  • iconfinder.com - "Search through 162,764 icons or browse 869 icon sets" a lot of offer right? Out from the big counts of icons, I am sure it can give you what you want to use for your blog. Actually, it's my first time to use this one, and what I found out? They have the latest social media icons for you like the beautiful Google+ in different custom colors!
  • iconspedia.com - this is the source of your free icons. You can download almost all kinds of icons such as Twitter icons with different sizes, and different file types and you can easily click "add to favorites".
  • veryicon.com - well, am amazed as you can also download different quality icons such as png and ico with different sizes! I must try this too!
  • iconlet.com - from the word "let", you have the chance to download and get free quality icons with 16x16 or 32x32 pixels icons! They are actually smaller icons such as customizing your author or contact info at your blog posts!
This is the list of top 5 free web icons sets you can download anytime, but I do not number them as am not sure yet which one is a lot better. I put findicons.com at the top because am currently enjoying it.

See you guys:)

Wednesday, June 6, 2012

3 Steps to Make Your Blog and Webpages Print Friendly


Are you planning to make your blog and webpages print friendly? That's not a problem at all because you can do that in 3 EASY steps. You don't need to be an expert or geek about codes and HTML - any blogger can make his blog print friendly.

What to do?

Sit back, and do this simple steps in front of your PC :)
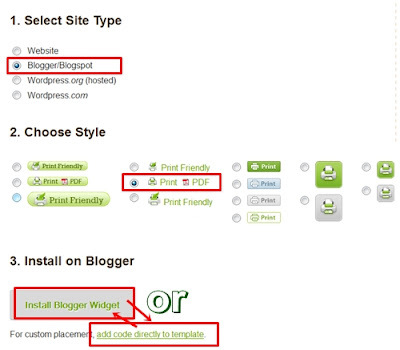
Go to printfriendly to choose a button for your blog.
  1. Select the site type, or the blog platform.
  2. Choose style - do you want buttons or links with printer icon?
  3. You're almost finished - if you choose blogger, you can allow printfriendly to add the widget by clicking "Install Blog Widget" or you can manually add the HTML codes to your blog template.
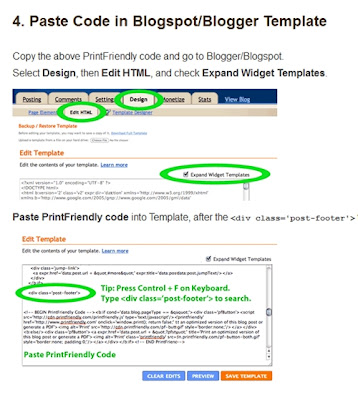
  4. If you choose the latter, then they have a pretty simple tutorial for you too:)
  5. It's easy so do it - if you want to make your blog print friendly for your readers. Simply paste the codes just after this as shown in the screenshot provided.
<div class='post-footer'>

Why use this widget?

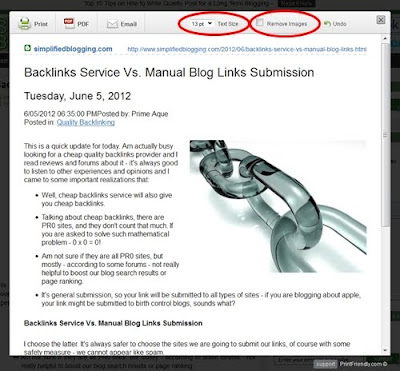
Sometimes, or oftentimes depending to how helpful our article or post is - our loyal readers would love to print a copy of our post, to give them some extra convenience, we can easily provide them a print friendly version of our webpages in a single click! Here is the sample:

  • Readers can able to print your post - or download a PDF copy.
  • Readers can adjust the texts - they can actually choose to have a bigger texts sizes.
  • They can email your post to their friends and colleagues.
  • They can choose to remove images and undo changes.
Do you want to grab the button? Do it now!

See you guys :) a short SB updates from me - Prime Aque

Tuesday, June 5, 2012

Backlinks Service Vs. Manual Blog Links Submission


This is a quick update for today. Am actually busy looking for a cheap quality backlinks provider and I read reviews and forums about it - it's always good to listen to other experiences and opinions and I came to some important realizations that:
  • Well, cheap backlinks service will also give you cheap backlinks.
  • Talking about cheap backlinks, there are PR0 sites, and they don't count that much. If you are asked to solve such mathematical problem - 0 x 0 = 0!
  • Am not sure if they are all PR0 sites, but mostly - according to some forums - not really helpful to boost our blog search results or page ranking.
  • It's general submission, so your link will be submitted to all types of sites - if you are blogging about apple, your link might be submitted to birth control blogs, sounds what?
Backlinks Service Vs. Manual Blog Links Submission
I choose the latter. It's always safer to choose the sites we are going to submit our links, of course with some safety measure - we cannot appear like spam.
  • First, we need to search for do follow blogs.
  • We will check if those blogs have PR, PR1 to 10. We can use prchecker!
  • These blogs must be relevant or related to our topic or niche.
I got your lists of Do Follow Blogs from YoungPrePro.com!
Enjoy several lists of do follow blogs, but check their PR and of course, if they are related to your particular blog! You can share your opinions - always remember - do not be a "Spam"! Here is the link - List Of 51 Dofollow Blogs to Comment On!

Image source: Backlink Tutorial | What are backlinks? @ bluesmanofmlm.com

I will be checking each link one by one the next time, keep posted guys!

See you. All the best - Prime Aque :)

Saturday, June 2, 2012

Create Free Infographics for your Facebook Page in Few Clicks

Facebook Infographics
Guys, heard about infographics? Well, do you wish to make your own - but you don't know how, or you don't know what free tool to use? It's not a problem anymore.
Anyway, what are infographics?
According to InstantShift, infographics are visual representations of information that use the elements of design to display content.

Infographics can be easily comprehended, as this is a simplified representation of complex ideas usually represented in texts or long sentences. Images or graphics are combined to portray a direct and precise information for any given data.

Let's create your own infographics!

Sounds exciting? There are several free tools on the web to create your first infographics. A Do It Yourself!

But, I found one that is a total instant maker for our Facebook and All-Stars Twitter Infographics! You don't need to practice or learn how to design or drag objects, add information or whatsoever! It's instant, like pouring hot water in a cup of noodles!
Create Your Infographics at Visual.ly
Here's what they do for you?
  • Build an infographics for your Facebook Fan Page in minutes!
  • Create a custom monster from your Facebook Stats (your Facebook account)!
  • Make a twitter account showdown of your favorite stars or You and your friend's!

What to do?

  1. Select a story - a particular infographics!
  2. Connect your account, if it's Facebook infographics, allow Visual.ly app to access your Facebook account! That's it!
  3. Customize - Select from available themes!
Now that you have your beautiful infographics, share it to Facebook, twitter or pin it! After that, get ready to download your infographics or just embed it! Well, here is the example below of SB's Facebook Fan Page!

create infographics with visual.ly

Want more infographic tools?

Browse for 9 Awesome Powerful Infographic Tools at InfographicsArchive

Copyright @ 2013 Simplified Blogging. Designed by Templateism | Love for The Globe Press