Announcement:

This is a Testing Annocement. I don't have Much to Say. This is a Place for a Short Product Annocement

Wednesday, August 15, 2012

Make Free Professional Blog Banners with Transparent Backgrounds

PhotoScape + FlamingText = Transparent background for blog banners

Do you wish to create a transparent background for your blog banners that will fit to your blog backgrounds without using Photoshop? Well, if you have a Photoshop installed in your PC, then you got no problem, but if you don’t you—need to continue reading this post.

There are several free banner makers out there, and one of them is BannerSnack, it is easy and instant medium of producing great banners, but the problem occur when you need to create a transparent banner to fit the background of your blog.

One of the easiest way to this is to use PhotoScape and FlamingText.

Steps:

  • Dowload PhotoScape safely using c|net here and install the all-in-one style photo editor (Mooii).
  • Here is a quick review of PhotoScape by death1968 at c|net:
Photoscape is a great programme for those who cannot afford Adobe Photoshop. It offers several filters, modification of curves (but not histograms), numerous pre-set effects (like specific film imitation effects, auto levels, vingetting, etc.). Batch processing permits for applying of routine adjustments (like renaming, photo enhancements, or re-sizing). Installation was easy (Win 7, 64 bit), software is stable, it is a full free version, contains no advertisements or junk add-ons. I can recommend Photoscape to anyone.

Create a transparent background using FlamingText with the help of PhotoScape:

  1. Choose logo from the 'Featured Logos' at FlamingText.
  2. Create a logo with transparent background, see screenshot below:
  3. Download the logo by clicking download, save file!
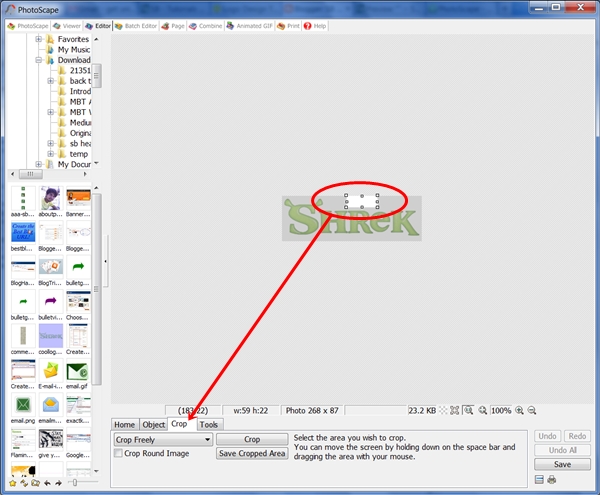
  4. Go to PhotoScape (assuming you are done installing it) and open Editor and look for your downloaded logo, then crop a little portion of the transparent logo background as shown below:
  5. Save the cropped image, re-size it (bigger), and save it as a permanent image for transparent banner making. In the example, I re-sized the image to 950 X 250 and saved it as transparent950X250.png which is good for blog header banner with transparent background! Remember, transparent image has a file extension of .png!
  6. Now, let's begin making a transparent banner for you blog. Use PhotoScape in making your banner, you can also create separate logos at FlamingText and combine it at PhotoScape Editor using the transparent image you just created. The banner below is for the SB Test Blog:
  7. See, it would fit to several blog backgrounds:

Are we done? No...

A creative blogger experiments, try to make your own, try to produce several banners of different styles, colors and sizes using this free resources and smart technique!

See you...

Saturday, August 11, 2012

Custom Contact Form for Your Blog - The Easiest Way!

Blogger is widely used as blogging platform, but if you wish to give your readers access to you privately, you need to rely on free contact form widgets to do that. Fortunately, we have so many free web resources to use. Anyway, why not give readers your email address directly? The answer is simple - it's not safe. You hate spammers right? In addition, I have found 3 Contact Form Builders that can provide you safe medium of communication with your valued readers.

If you want to customize the look of your contact form to make it part of your blog theme, you can do that easily by following a tutorial I simplified for you. It's the easiest way of adding a customized contact form to your blog without going to your blog template. Just create a new page, then paste it there! As simple as that. Are you ready? We will be using emailmeform!
This tutorial has two parts. First, the installation of your custom contact form which is very simple! Second, creating your account at emailmeform which is guided here step by step with illustrations.

First Part: Log-in to your blog and click Posting, but instead of choosing New Post, select Edit Pages. Then, click New Page!
Just like writing your new post, think of a name e.g. Contact Me or Contact Us. Carefully Copy the codes after the screen-shot below and Paste them there. Yes, as simple us that. Just above the pasted codes, you can write something...
Carefully copy the codes just below and paste it - see screen-shot above:
<style>
/* contact me form: tutored by MBT (mybloggertricks.com), redesigned by Prime Aque-SB (simplifiedblogging.com) */
input.sbcontact {
color:#000000;
font: 12px Arial,Helvetica,Sans-serif;
background-color:#FFFFFF;
padding-left: 6px;
border:2px solid #347235;-moz-border-radius:5px;
-webkit-border-radius:5px;
border-radius:5px;
}
input.sbcontacthov {
color:#FFF;
font: 12px Arial,Helvetica,Sans-serif;
background-color: #347235;
border:2px #733572 solid; -moz-border-radius:5px;
-webkit-border-radius:5px;
border-radius:5px;
}
textarea {width:97%; color:#000000;
font: 14px Arial,Helvetica,Sans-serif;
background-color:#FFFFFF;
padding-left: 6px;padding-right: 6px;padding-top: 6px;
border:2px solid #347235;-moz-border-radius:10px;
-webkit-border-radius:10px;
border-radius:10px; }
textareahov { width:97%;
color:#FFF;
}
</style>
<form action="http://www.emailmeform.com/builder/form/sARau137XI0" charset="UTF-8" enctype="multipart/form-data" method="post">
<table bg="" border="0" cellpadding="2" cellspacing="0" style="color:white;"><tbody>
<tr><td><span style="font-family:Verdana;font-size:85%;color:black;"></span><div id="mainmsg">
</div>
</td></tr>
</tbody></table>
<table bg=""border="0" cellpadding="2" cellspacing="0" style="color:white;"><tbody>
<tr valign="top"><td nowrap="nowrap"><span style="font-weight: bold; color: rgb(102, 102, 102);font-family:Verdana;font-size:12px;">Name:</span></td><td><input class="sbcontact" maxlength="100" name="FieldData0" size="40" value="" type="text"> </td></tr>
<tr valign="top"><td nowrap="nowrap"><span style="font-weight: bold; color: rgb(102, 102, 102);font-family:Verdana;font-size:12px;">Email:</span></td><td><input class="sbcontact" maxlength="100" name="FieldData1" size="40" value="" type="text"> </td></tr>
<tr valign="top"><td nowrap="nowrap"><span style="font-weight: bold; color: rgb(102, 102, 102);font-family:Verdana;font-size:12px;">Subject:</span></td><td><input class="sbcontact" maxlength="100" name="FieldData4" size="60" value="" type="text"> </td></tr>
<tr valign="top"><td nowrap="nowrap"><span style="font-weight: bold; color: rgb(102, 102, 102);font-family:Verdana;font-size:12px;">Message:</span></td><td><textarea cols="90" name="FieldData5" rows="15"></textarea></td></tr>
<tr><td colspan="2"></td></tr>
<tr><td></td><td align="left"><input maxlength="100 " name="hida2" size="3" style="display: none;" value="" type="text"><input onmouseover="this.className='sbcontact sbcontacthov'" onmouseout="this.className='sbcontact'" class="sbcontact" name="Submit" value="Submit " type="submit"> <input onmouseover="this.className='sbcontact sbcontacthov'" onmouseout="this.className='sbcontact'" class="sbcontact" name="Clear" value=" Clear " type="reset"></td></tr>
<tr><td colspan="2" align="center"></td></tr>
</tbody></table>
<p></p>
<i><a href="http://www.simplifiedblogging.com/2012/01/custom-contact-form-for-your-blog.html">Make your own custom contact form!</a></i>
</form>
Preview your contact page, if it's working, publish it right then so we can proceed to the next part!


Second Part:

1. Sign up or Register at emailmeform.com, if you are done, find for the button Add Form, kindly follow screen-shots.

NOTE: Please save every changes you'll going to make.


2. Click Add Form button and a pop-up box will appear giving you two choices. Please click the first one which says I'd like to choose from a list of free-made forms.


3. You will be redirected to a page containing a simple contact form, the next step is to click customize button.


4. This time, you need to open the settings to make some important changes at its default settings.


A. In your confirmation setting, choose redirect URL. You can either use the contact us page URL (if you want this, copy your contact page URL you recently published) or your blog homepage URL. If you choose the first, then after your reader sent his message, emailmeform will redirect him again to your Contact Page, or if you choose the second one, you reader will be redirected to your blog homepage.

B. In your Label Placement setting, choose Left Aligned.

C. In your Send Button Alignment setting, choose Left.

D. In your Anti Spam setting, choose None. Most blog spammers do not disclose information, since they are required to submit valid email address, they might hesitate to spam you. Now Save!

5. After saving data, choose Take me back to the form manager. Base on the screen-shot, kindly click notifications.


6. This time you are under Recipient Notifications page, the recipient is you so you need to provide your valid email address where you wish to receive messages sent to you via your blog contact page. Carefully supply your email address and click that green plus button and save your data again!This time, choose Open new window and view my form!


7. You are almost done! A new window or tab will open containing your contact form. All you have to do is Copy and Paste your full contact form URL at the address bar as shown below and securely put it in a notepad.


8. Please go back to you blog dashboard and this time, edit your contact page, you need to change the contact form URL (as the default is mine). Note: Please do not get confuse with the screen-shot as I made the marking in a notepad, now proceed to your Contact Page and carefully find the code I gave below.


>>Search for http://www.emailmeform.com/builder/form/sARau137XI0 (the one enveloped with blue box in the screen-shot) and replace that one with your contact form URL you recently pasted in a notepad! Carefully watch for the opening " and closing " just before and after the contact form URL at the codes provided, never omit any of them.

Note: You might also want to change the border color of your custom contact form, so if in case, please follow the one I enveloped with red boxes.

9. If you make changes with the border color, preview it before publishing just to make sure your new color is showing! If it's perfectly working, published your contact page! Now your Contact Page is ready!

If in case you encountered some problem, please do not hesitate to send your queries at the Contact Us Page or directly drop them at the comment area.

Thursday, August 2, 2012

Free Web Resources that Analyze Your Blog Traffic

There are numerous small pieces and programs of software on the web which can create your blog very nice and very proficient, to spotlight on some special programs which will assist you to discover what type of traffic you are receiving and whether it is helpful web traffic or in case you are receiving any type of traffic at the entire.
The primary piece of the resource or software is known as Google Analytics.
This is completely free type of resources and software which you can place into the code of website or blog. In case you are not very relaxed with regulating the code of website or blog do not be anxious, there are extremely clear commands on where to position it. One time there it can provide you the entire types of helpful details such as the person who is searching your website, from where and how lengthy they are spend on every page. This can assist you to search out what is receiving the mainly attention on the website and after that you can correct your website content consequently.
The next resource or pieces of the software which will confirm helpful arrive from the website known as click tale.
This is the same piece of the software in a few manners except it shows details in the mode of image so you can distinguish what persons have been performing on your site and wherever they have been hitting. It even has the helpful characteristic of displaying you where persons are ending on your webpage. This assist you situate the adverts wherever they are moving to be observed the mainly. It is completely free for the essential service except you can compensate for the service of premium facility. In case you are simply just beginning out then it is value paying for the service of premium membership.
The final resource or piece of program is known as stat counter.
This is good as it display you extremely just how a lot of persons have searched your site and how a lot of of those are exclusive visitors. It possibly does not provide you the similar type of information like the additional two except it is the very obvious and it is the just single that permits you to place a counter on the website. You can allow persons who search your site or online blog to appear at this information or only explain them how a lot of persons have been to your website.

Image Source: volacci.com

Copyright @ 2013 Simplified Blogging. Designed by Templateism | Love for The Globe Press