If you want to customize the look of your contact form to make it part of your blog theme, you can do that easily by following a tutorial I simplified for you. It's the easiest way of adding a customized contact form to your blog without going to your blog template. Just create a new page, then paste it there! As simple as that. Are you ready? We will be using emailmeform!
This tutorial has two parts. First, the installation of your custom contact form which is very simple! Second, creating your account at emailmeform which is guided here step by step with illustrations.
First Part: Log-in to your blog and click Posting, but instead of choosing New Post, select Edit Pages. Then, click New Page!
Just like writing your new post, think of a name e.g. Contact Me or Contact Us. Carefully Copy the codes after the screen-shot below and Paste them there. Yes, as simple us that. Just above the pasted codes, you can write something...
Carefully copy the codes just below and paste it - see screen-shot above:
<style>
/* contact me form: tutored by MBT (mybloggertricks.com), redesigned by Prime Aque-SB (simplifiedblogging.com) */
input.sbcontact {
color:#000000;
font: 12px Arial,Helvetica,Sans-serif;
background-color:#FFFFFF;
padding-left: 6px;
border:2px solid #347235;-moz-border-radius:5px;
-webkit-border-radius:5px;
border-radius:5px;
}
input.sbcontacthov {
color:#FFF;
font: 12px Arial,Helvetica,Sans-serif;
background-color: #347235;
border:2px #733572 solid; -moz-border-radius:5px;
-webkit-border-radius:5px;
border-radius:5px;
}
textarea {width:97%; color:#000000;
font: 14px Arial,Helvetica,Sans-serif;
background-color:#FFFFFF;
padding-left: 6px;padding-right: 6px;padding-top: 6px;
border:2px solid #347235;-moz-border-radius:10px;
-webkit-border-radius:10px;
border-radius:10px; }
textareahov { width:97%;
color:#FFF;
}
</style>
<form action="http://www.emailmeform.com/builder/form/sARau137XI0" charset="UTF-8" enctype="multipart/form-data" method="post">
<table bg="" border="0" cellpadding="2" cellspacing="0" style="color:white;"><tbody>
<tr><td><span style="font-family:Verdana;font-size:85%;color:black;"></span><div id="mainmsg">
</div>
</td></tr>
</tbody></table>
<table bg=""border="0" cellpadding="2" cellspacing="0" style="color:white;"><tbody>
<tr valign="top"><td nowrap="nowrap"><span style="font-weight: bold; color: rgb(102, 102, 102);font-family:Verdana;font-size:12px;">Name:</span></td><td><input class="sbcontact" maxlength="100" name="FieldData0" size="40" value="" type="text"> </td></tr>
<tr valign="top"><td nowrap="nowrap"><span style="font-weight: bold; color: rgb(102, 102, 102);font-family:Verdana;font-size:12px;">Email:</span></td><td><input class="sbcontact" maxlength="100" name="FieldData1" size="40" value="" type="text"> </td></tr>
<tr valign="top"><td nowrap="nowrap"><span style="font-weight: bold; color: rgb(102, 102, 102);font-family:Verdana;font-size:12px;">Subject:</span></td><td><input class="sbcontact" maxlength="100" name="FieldData4" size="60" value="" type="text"> </td></tr>
<tr valign="top"><td nowrap="nowrap"><span style="font-weight: bold; color: rgb(102, 102, 102);font-family:Verdana;font-size:12px;">Message:</span></td><td><textarea cols="90" name="FieldData5" rows="15"></textarea></td></tr>
<tr><td colspan="2"></td></tr>
<tr><td></td><td align="left"><input maxlength="100 " name="hida2" size="3" style="display: none;" value="" type="text"><input onmouseover="this.className='sbcontact sbcontacthov'" onmouseout="this.className='sbcontact'" class="sbcontact" name="Submit" value="Submit " type="submit"> <input onmouseover="this.className='sbcontact sbcontacthov'" onmouseout="this.className='sbcontact'" class="sbcontact" name="Clear" value=" Clear " type="reset"></td></tr>
<tr><td colspan="2" align="center"></td></tr>
</tbody></table>
<p></p>
<i><a href="http://www.simplifiedblogging.com/2012/01/custom-contact-form-for-your-blog.html">Make your own custom contact form!</a></i>
</form>
Preview your contact page, if it's working, publish it right then so we can proceed to the next part!Second Part:
1. Sign up or Register at emailmeform.com, if you are done, find for the button Add Form, kindly follow screen-shots.
NOTE: Please save every changes you'll going to make.
2. Click Add Form button and a pop-up box will appear giving you two choices. Please click the first one which says I'd like to choose from a list of free-made forms.
3. You will be redirected to a page containing a simple contact form, the next step is to click customize button.
4. This time, you need to open the settings to make some important changes at its default settings.
A. In your confirmation setting, choose redirect URL. You can either use the contact us page URL (if you want this, copy your contact page URL you recently published) or your blog homepage URL. If you choose the first, then after your reader sent his message, emailmeform will redirect him again to your Contact Page, or if you choose the second one, you reader will be redirected to your blog homepage.
B. In your Label Placement setting, choose Left Aligned.
C. In your Send Button Alignment setting, choose Left.
D. In your Anti Spam setting, choose None. Most blog spammers do not disclose information, since they are required to submit valid email address, they might hesitate to spam you. Now Save!
5. After saving data, choose Take me back to the form manager. Base on the screen-shot, kindly click notifications.
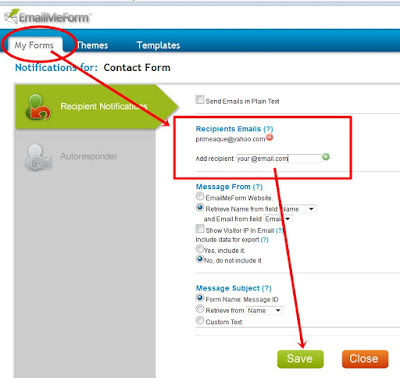
6. This time you are under Recipient Notifications page, the recipient is you so you need to provide your valid email address where you wish to receive messages sent to you via your blog contact page. Carefully supply your email address and click that green plus button and save your data again!This time, choose Open new window and view my form!
7. You are almost done! A new window or tab will open containing your contact form. All you have to do is Copy and Paste your full contact form URL at the address bar as shown below and securely put it in a notepad.
8. Please go back to you blog dashboard and this time, edit your contact page, you need to change the contact form URL (as the default is mine). Note: Please do not get confuse with the screen-shot as I made the marking in a notepad, now proceed to your Contact Page and carefully find the code I gave below.
>>Search for http://www.emailmeform.com/builder/form/sARau137XI0 (the one enveloped with blue box in the screen-shot) and replace that one with your contact form URL you recently pasted in a notepad! Carefully watch for the opening " and closing " just before and after the contact form URL at the codes provided, never omit any of them.
Note: You might also want to change the border color of your custom contact form, so if in case, please follow the one I enveloped with red boxes.
9. If you make changes with the border color, preview it before publishing just to make sure your new color is showing! If it's perfectly working, published your contact page! Now your Contact Page is ready!
If in case you encountered some problem, please do not hesitate to send your queries at the Contact Us Page or directly drop them at the comment area.

Lorem ipsum dolor sit amet, consectetur adipisicing elit, sed do eiusmod tempor incididunt ut labore et dolore magna aliqua. Ut enim ad minim veniam, quis nostrud exercitation.


